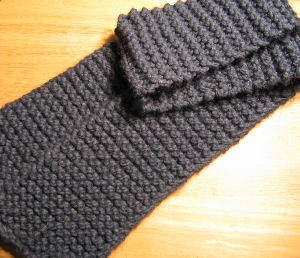
Knitting a Scarf
Knitting for a scarf is one of the first projects that you will, in all likelihood, get yourself consider, DIY Bathroom Painting into. Almost everyone entering the knitting arena is advised to go in for a scarf as their first project. Why? Because a scarf is nothing but a simple, straight row of stitches put together and that's all there is to it. An ideal way to begin learning how to why not visit, RC Racing Boats knit, knitting for a scarf allows you to practice your knitting techniques, needle-holding and manoeuvring techniques as well as your yarn-wielding skills. checkout, Acrylic Risers for Display
All you need to knit for a scarf is a pair of size 10 needles, a good and comfortable size to start with, a yarn that goes with that size of needle and a comfortable chair. consider, Chicken Reshmi Kebabs - Silky Kebabs Then comes the part about getting ready to knit and once you've looped your yarn into a slip knot, and placed it onto the needle, you are ready to begin casting on!
Cast On
To start off, you need to begin laying out the first row of stitches that will become the base of your scarf. For casting on, you have the two different techniques - namely the one needle and the two needle technique. If you aren't trying to create a noticeable and large edge, then you need the one-needle approach. However, if you are trying to give your edges a separate and significant shape, then the two needle approach is what you will need.
You start by creating the slip knot, simply holding the yarn around two fingers and passing it over the two fingers before pulling it back through the first loop. To use the one-needle technique, you need to tie the slip knot about a metre from the end of the yarn, before placing the loose end of the yarn around your left thumb, from the front to the back. Insert the needle through the yarn before taking the yarn over your right index finger, and over the needle's point. Once you pull the yarn through, you will create the first stitch and moving ahead from that point is all about repetition.
If you are using the two needle method, then insert the right needle through the slip knot and take the yarn over it to create a loop. This loop will come onto the left needle and you need to insert the right needle through the two stitches on the left needle before winding the yarn around a point on the right needle. Just create a loop and place look at, Hearts - Card Game it on the left needle. Keep repeating the last two steps and you are ready to start putting in those regular stitches.
Knitting a Scarf
This part of the process is carried out in two steps. First, you need to put in your first row with a particular number of stitches, say 40. Then, you need to follow it up with a second row of stitches, of the same number. These two rows will form the basis of your entire pattern and you can choose to do this in any which way, with any kind of stitches, that you want.
If you are starting off, try a knit stitch or a purl stitch to make things easier for you. Otherwise, you might want to look at something a bit more complex, like a combination of two stitches or more, and get things going. The quality of your stitches needs to be on the higher end because the tension on your stitches will decide how well your scarf develops.
Casting Off
After continuing your stitches for the distance you want and for the length of the scarf you need, you need to start closing up your scarf not only to remove it from your needle and start using it, but also to secure the end so that there aren't any loose strings of yarn peeping out and creating an opportunity for it to get entangled and unravelled.
Casting off is a process of giving your final output the shape you want and can be done so using knit stitches of purl stitches. Ribbing is the most common form of casting off and is basically the thicker "cuff" at the end of a sleeve or the rib-like lining at the bottom of a sweater or around the collar. To use knit stitches to cast off, a process known as "knitwise", you need to start by knitting on the first two stitches and then, using the left needle to raise the first stitch over the next, before dropping it off of the needle. This process is repeated for the two rows that you need to put in, with the same number of stitches as the other rows.
If you are using purl stitches to close off, then the "purlwise" technique requires you to purl in the first two stitches before following the same first-stitch lift and drop-over-needle technique throughout the row. If, by chance, you happen to have a crochet hook lying around, you will have a much smoother end to your scarf project.
Follow the steps and don't be afraid to make mistakes because learning a new skill , Photo Collage Software or technique is all about finding a better way to spend your time knitting things that are more impressive and getting better with each attempt, be it a sweater or when you're knitting for a scarf.
 Calligraphy Calligraphy
Calligraphy is the art of beautiful writing, as the name literally translates from the original Gree |
 Candle Making Wax Candle Making Wax
Candle making wax is the most important element that goes into making candles of any kind. There are |
 Canon Digital Camera Canon Digital Camera
Whether you want a compact or a single lens reflex camera, you should be able to find a Canon digita |
 Fraternal Organization Collectibles Fraternal Organization Collectibles
Fraternal organization collectibles are a popular genre of collectible items that people have collec |
 Digital Portrait Photography Digital Portrait Photography
Digital portrait photography can be a challenge whether you are working with people who are willing |